

Shoulder pain is one of the most common reasons individuals seek orthopedic care, and subacromial shoulder impingement stands as a leading cause across all age groups. This condition affects a diverse population, ranging from competitive overhead athletes to office workers spending long hours behind computer screens with poor sitting posture.
Shoulder impingement occurs when the tendons of the rotator cuff or the subacromial bursa—a small fluid-filled sac that cushions the joint—become compressed, pinched, or irritated beneath the acromion, which is the bony tip of your shoulder blade. This structural compression leads to a persistent ache, catching sensations, and sharp pain during everyday activities like reaching overhead, lifting household items, or even trying to find a comfortable sleeping position at night.
While clinical interventions such as targeted injections and diagnostic imaging play an essential role in comprehensive care, structured physical therapy and a dedicated home exercise program serve as the true cornerstone of long-term, non-surgical recovery. Performing targeted, evidence-based movements helps correct muscle imbalances, strengthen your protective rotator cuff, stabilize your shoulder blades, and optimize posture. This ultimately opens up the restricted subacromial space, relieving pressure on irritated soft tissues and restoring full joint function without the need for invasive surgical procedures.
At Joint Health Solutions, we focus on empowering patients to manage shoulder impingement using a comprehensive approach that combines hands-on clinical guidance, advanced non-surgical modalities, and customized home exercise protocols. This extensive guide explores the mechanics of why targeted exercise works, outlines critical safety protocols you must follow, provides a step-by-step breakdown of five physical therapy exercises you can do at home, and explains when to seek professional intervention.
To understand why exercise is such an effective treatment for shoulder impingement, it helps to look at the functional root causes of subacromial crowding:
Muscle Imbalances: Impingement often develops when the deep muscles of the rotator cuff and the scapular stabilizers become weak. At the same time, the anterior chest muscles (the pectorals) and the upper trapezius can become tight and overactive. This imbalance pulls the joint out of its optimal alignment.
Postural Deficiencies: Chronic postural habits, such as rounded shoulders, a slouched mid-back, and forward head posture, physically alter the position of the scapula. This tilt reduces the subacromial clearance space, increasing the likelihood of tissue pinching during arm movement.
Repetitive Overhead Strain: Performing repetitive overhead activities—such as swimming, throwing, painting, or construction work—without proper biomechanical control can lead to micro-trauma and localized swelling within the joint.
A structured physical therapy exercise program targets these specific deficiencies to restore natural, pain-free shoulder mechanics:
Rotator Cuff Strengthening: Strengthening the supraspinatus, infraspinatus, teres minor, and subscapularis muscles helps keep the humeral head centralized within its shallow socket. This action prevents the upper arm bone from migrating upward and impinging tissues beneath the bone during lifting movements.
Scapular Stabilizer Conditioning: Strengthening muscles like the rhomboids, lower trapezius, and serratus anterior ensures your shoulder blade upwardly rotates and retracts smoothly as you raise your arm. This mechanical adjustment maintains an open subacromial pathway.
Anterior Flexibility Restoration: Stretching tight pectoral muscles allows the shoulder complex to transition backward into a neutral alignment, correcting rounded shoulder posture.
Movement Re-Education: Training your body to use proper movement patterns protects your recovering tendons from repetitive micro-pinching, helping to prevent future injury flares.
Clinical studies show that patients who commit to a consistent, high-quality shoulder exercise program for 6 to 12 weeks achieve significant pain reduction and lasting functional improvements.
While a home exercise program is an excellent tool for recovery, it must be performed safely to avoid further tendon irritation. Keep these clinical precautions in mind before starting your routine:
To maximize your recovery and prevent subacromial crowding, strictly adhere to the following safety measures:
If your shoulder pain persists, worsens, or shows no measurable improvement after 2 to 4 weeks of consistent daily exercise, pause your home routine and schedule a professional diagnostic evaluation.
Persistent or worsening symptoms frequently require advanced intervention. You may benefit from hands-on manual physical therapy, personalized biomechanical retraining, or targeted non-surgical modalities to reduce localized inflammation and accelerate tissue healing.
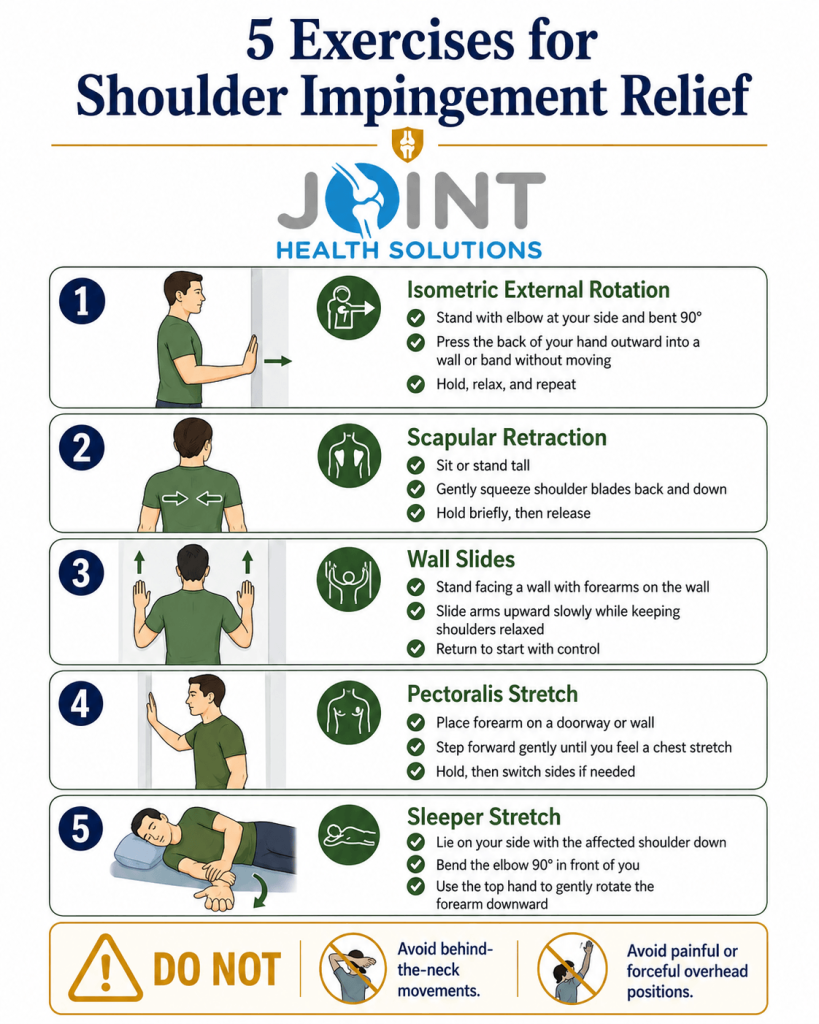
Perform these therapeutic exercises slowly and with absolute control, focusing on proper form and muscle activation rather than speed or high resistance.
Primary Target: The deep external rotators of the rotator cuff (infraspinatus and teres minor). This exercise activates these critical stabilizing muscles without moving the joint, making it exceptionally safe to perform even during an acute pain flare.
Repetitions & Frequency: Perform 10 to 15 repetitions per set, aiming for 2 to 3 sets daily.
Biomechanical Benefit: This isometric activation builds foundational strength in the external rotators without placing mechanical stress on the impinged tendons.
Primary Target: The rhomboids and middle trapezius muscles. This movement helps correct rounded posture and opens up the subacromial space.
Repetitions & Frequency: Complete 10 to 15 repetitions, for 2 to 3 sets daily.
Biomechanical Benefit: This exercise strengthens the posterior upper back muscles, helping to correct rounded shoulders and lower the risk of subacromial pinching.
Primary Target: The lower trapezius and serratus anterior muscles. This exercise supports proper upward rotation of the shoulder blade during overhead movements.
Repetitions & Frequency: Perform 10 to 15 repetitions, for 2 to 3 sets daily.
Biomechanical Benefit: This exercise trains scapular mechanics, helping to protect the shoulder joints during overhead reaching tasks.
Primary Target: The pectoralis major and pectoralis minor chest muscles. Tight chest muscles pull the shoulders forward, directly contributing to impingement issues.
Repetitions & Frequency: Repeat the stretch 2 to 3 times sequentially, performing the routine twice daily.
Biomechanical Benefit: Lengthening tight chest muscles allows the shoulder complex to rest in a neutral position, widening the subacromial space.
Primary Target: The posterior joint capsule and deep external rotators of the shoulder. This stretch helps restore essential internal rotation range of motion.
Repetitions & Frequency: Repeat 2 to 3 times, once daily.
⚠️ Caution Note: Never force this movement or apply sudden downward pressure, as this can severely irritate sensitive tissues. If you feel a sharp pinch in the front of your shoulder, stop immediately.
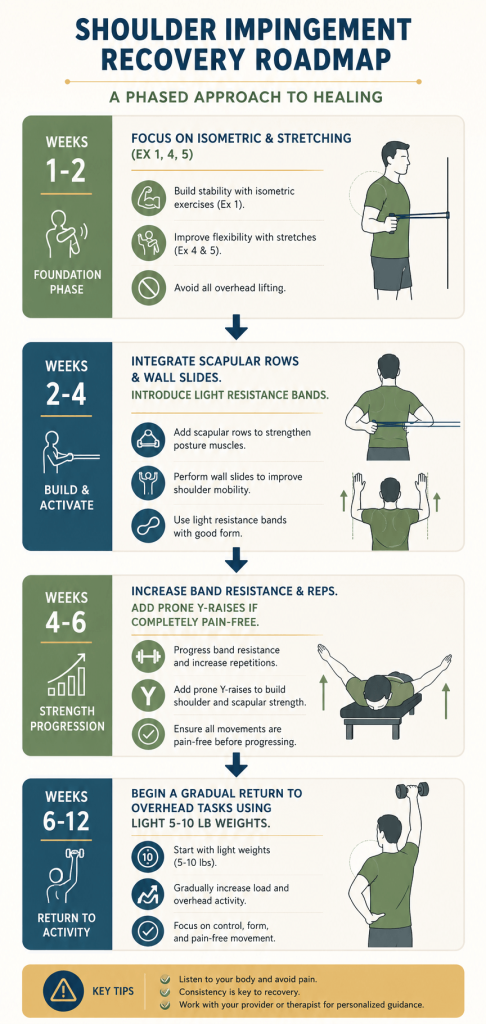
Progressive Shoulder Rehabilitation – Clinical Notes
Weeks 1–2: Prioritise isometric holds and gentle stretches (Exercises 1, 4, 5). No overhead lifting.
Weeks 2–4: Add scapular rows and wall slides. Begin light resistance band work with controlled form.
Weeks 4–6: Gradually increase band tension and repetitions. Introduce prone Y‑raises only if you remain completely pain‑free.
Weeks 6–12: Ease into overhead movements using very light weights (5–10 lbs). Focus on smooth, controlled motion.
Important safety reminder – not shown on the roadmap:
If you notice increased pain, localised swelling, or reduced range of motion at any stage, decrease resistance immediately and consult your healthcare provider before progressing further.
While consistent home exercise programs are highly effective for managing early-stage shoulder impingement, some cases require professional support. Consider scheduling a clinical consultation if you experience any of the following signs:
Persistent Discomfort: Your shoulder pain continues without improvement after 4 to 6 weeks of consistent, correct daily exercise.
Functional Weakness: You experience noticeable weakness or find it difficult to lift your arm past a 90-degree angle against light resistance.
Disrupted Sleep: Intensely painful arousals wake you from sleep when you accidentally roll onto the affected shoulder, which can sometimes indicate a underlying rotator cuff tear.
Significant Limitations: You are unable to complete basic daily activities, such as getting dressed, grooming your hair, or reaching for items on low shelves.
At Joint Health Solutions, we provide comprehensive, non-surgical options tailored to your recovery needs:
Coordinated Physical Therapy: We provide referrals to a network of physical rehabilitation specialists for hands-on manual physical therapy and guided exercise.
Targeted Cortisone Injections: For severe, disruptive pain, an ultrasound-guided cortisone injection can help calm intense inflammation. This creates a more comfortable window that allows you to perform your rehabilitation exercises effectively.
Advanced PRP Therapy: For chronic tendinopathy, recurring wear, or partial rotator cuff tears, Platelet-Rich Plasma (PRP) therapy introduces concentrated cellular growth factors directly to the affected tendons to support tissue recovery.
To learn more about our non-surgical treatment approaches, please visit our Shoulder Pain Charlotte condition platform.
Most patients begin to notice improvements in daily comfort and mobility within 2 to 4 weeks of starting a consistent home exercise routine. Achieving a full recovery and restoring comprehensive tissue strength typically requires 6 to 12 weeks of regular exercise.
No, you should never push through sharp or pinching pain. If an exercise causes sharp discomfort, pause that specific movement immediately. Stick strictly to pain-free exercises and consider seeking a professional medical evaluation to ensure proper form.
Not at all. For the first two weeks of your program, you can complete your routine using just your body weight and wall stretches. As your tissue strength improves, you can easily introduce light resistance loops or light 1 to 3-pound hand weights (or standard household items like water bottles) to progress the exercises.
It is best to temporarily pause overhead activities—such as tennis, competitive swimming, baseball, or volleyball—until you can complete your daily routines pain-free and demonstrate a full range of motion. Participating in low-impact activities like fitness walking, elliptical training, or stationary cycling is perfectly fine and encouraged.
Many partial-thickness rotator cuff tears respond very well to non-surgical physical therapy and regenerative treatments like PRP therapy. However, if you suspect or have been diagnosed with a full-thickness tear, you should consult your care provider for an assessment and to discuss whether a surgical consultation is appropriate.
For optimal results, aim to perform your home exercise routine daily, or at least 5 to 6 times per week. When recovering from shoulder impingement, maintaining a consistent routine is more important than increasing the intensity or resistance of the exercises.
Yes, absolutely. Chronic postural habits—such as rounded shoulders and forward head alignment—physically tilt the shoulder blade forward, which directly narrows the subacromial space. Including regular scapular retraction exercises in your routine is essential to help open up this space.
Not necessarily; many patients successfully recover using structured physical therapy alone. However, if severe, persistent pain prevents you from performing basic stretches comfortably, a targeted cortisone injection can help reduce local inflammation, creating a more comfortable window to advance your therapy.
If you complete 3 to 6 months of a high-quality physical therapy program, combined with appropriate clinical injections or custom bracing, but continue to experience disabling pain or functional weakness, surgery may be considered. An arthroscopic subacromial decompression can be discussed with an orthopedic specialist to remove bone spurs and widen the joint space.
Getting started is simple. Call our office or visit our online patient portal to schedule an initial consultation. Our clinical team will thoroughly examine your shoulder, provide an accurate diagnosis, and design a comprehensive non-surgical care plan tailored to your recovery goals.

A board-certified physician in Emergency Medicine and Obesity Medicine with over 25 years of experience

A board-certified Family Nurse Practitioner with over 12 years of nursing experience